Friday, February 28, 2014

Braided Bread

(Adapted from theKitchn: How to make Challah Bread) 

 
The month of February is possibly everyone's favorite month of the year. The severe chill of harsh winters mellows down to a soft chill in the air. You get more sunshiny days, more holidays and the very soul bursts out in jubilation that its Spring! Spring! Spring!
 
Winters are always the time to dine well. That is not to say that one does not eat well in summers. Somehow, the winters for me (and my family) are always synonymous with lovely soups, crunchy home-made bread, succulent roasted chicken, and dreamy "oh-so-melt-in-the-mouth" cakes! Ummmmm!
 
So before the winter finally bids goodbye, I decided to crank up my oven and bake a braided bread that I had bookmarked for a long, long, time. The Bread # 14 February challenge on the We Knead to Bake Group was to bake a bread of one's own choice. All the more reason for me to go right ahead and bake this beautiful braided challah bread.


The challah is basically a Jewish bread that is baked on Hanukkah. For the Jewish high holidays, this bread is wound into a circle after braiding that gives a lovely braided bun. The recipe contains eggs. But this bread does not have any dairy products like milk or butter as per Jewish traditions.
 
Nonetheless, you will get a super-soft, sweet bread that complements any meat dish. I got the recipe here.
 
Here is how I made it:
 

Ingredients:

Instant yeast: 2 tsp
Warm water: 1 cup
All-purpose flour: 4 -41/2 cups
White granulated sugar: 1/4th cup
Salt: 2 tsp
Eggs: 2
1 large egg yolk
Oil: 1/4th cup
 
For egg-wash:
One egg white mixed with 1/2 cup water
 

Process:

1. Dissolve the yeast in warm water and add a healthy pinch of sugar. Keep undisturbed for a few minutes. After several minutes, you can see a frothy layer on top of the yeast mixture. This signifies that the yeast is active.
2. Mix flour, sugar, salt in a bowl.
3. Make a well in the center of the flour mixture and add the eggs, egg yolk, and oil. Now start mixing the dough with hands or using the dough hook in a stand mixer.
4. When the dough is firm, smooth and springs back on punching down, it is ready. Place dough in a deep-bottom pan and keep covered with cling film or a kitchen towel in a dry, warm place.
Dough before rising
 
5. After 1 and a half to 2 hours the dough will rise to double its size.
Dough after rising
6. Separate the dough into 6 equal pieces. Roll out on a working surface dusted with some dry flour. Each piece should look like a long rope with 1/2 inch thickness.
 
3 of the ropes
7. Gather the ropes and squeeze them together at the very top. If you want to braid a three-strand challah, braid it like one braids hair. For a six stranded challah, visit this link to view the step-by-step process of braiding.
 
 
Here are some pictures of the braiding process:


8. Once you finish braiding, tuck the loose ends under the loaf and pinch to seal the edges.


 9. Line a baking tray with butter paper. Grease with oil or dust with some dry flour. Place the braided loaf on the tray and cover with a kitchen towel. Keep in a warm, dry place for 20 minutes.
 
10. After 20 minutes the loaf will rise and appear puffed up. In the meantime, pre-heat the oven to 350 degrees F or 176 degrees C for about 20 minutes.
11. Sprinkle some sesame seeds on the loaf and apply the egg-wash all over the loaf carefully. Each nook and crevice should be covered with egg wash. Place the loaf in pre-heated oven and bake for 30-35 minutes. You may rotate the tray half-way during baking time, to enable uniform baking.
12. Take the challah out of the oven. If the braided loaf is uniformly brown on all sides, it is done!
13. Cool the loaf to room temperature before slicing. Enjoy!


Thursday, February 6, 2014

Spicy Soya Calzone...Made at Home!

This week, the Kolkata Food Bloggers theme is Yeasty- Feasty a.k.a Bread Basket. Now, no one needs to be told that this is just my kind of theme. Anything that deals with bread baking, is a super-hit with me.

First I planned to put in a recipe of the wonderful Hokkaido Milk Bread for this yummy event. Then changed my mind at the last moment and decided to put in a bread-based snack.

This snack is called Calzone and I came to know about it thanks to my niece and nephew who are totally into Calzones or Subway sandwiches. Looking at teenagers now-a-days I feel quite silly because during my teenage years I hardly knew what a "sub" or "ravioli" looked like! Hamari favourite two-minute Maggi or Lays chips were enough to make me really happy! Gorging on momos and fruit beer was a gala feast back then! :)

However, these days, even my six-year-old knows all about pizzas, pasta, garlic bread...what-have-you! So I try to keep up with the youngsters lest I hear the age-old dictum "Tomader shomoy ei shob chilo na Mummy?"(Were'nt all these food stuffs available when you were a kid, Mummy?)

These Calzones were made pretty fast. I had some bread dough in my freezer and the stuffing was made up of soya-nuggets curry and chopped vegetables.


Here is the recipe:

Ingredients:

(Makes 10)
Bread dough - enough to fill a medium sized bowl
For the stuffing:
Soya-nuggets curry - 1/2 cup
(Alternatively, you can use, paneer bhurji, egg bhurji, boiled shredded chicken, or any dry sabzi)
Tomato - one (chopped)
Carrots - one (cut into small 1/2 inch pieces)
Capsicum - 1 (cut into juliennes)
Shredded mozzarella cheese - 3 tbsp. (optional)
Egg - 1 (for egg wash)

Process:

1. For preparing bread dough, you can refer to my recipe here. The only variation I made in the recipe is that I added 1/2 cup of dalia (not oats) while preparing the dough. Just to make it more crunchy and healthy. You need to use half of the dough that you will prepare using this recipe. Store the rest of the dough in the freezer for later use or bake into a loaf, buns....whatever..the choice is yours to make!
2. Make a lemon sized ball with a portion of the dough. Roll out into a chapatti of 1/2 inch thickness.
 
 
3. Add the stuffing in the center of the chapatti.
 
4. Fold one flap of the chapatti over the stuffing and press with your fingers. Now roll the rest of the chapatti to seal the ends like we do for a Gujiya or a Momo. Press the edges down with a fork.


5. Keep covered in a warm place for 20 minutes. In the meantime, pre-heat the oven to 210 degrees C for ten minutes.
 
6. Grease a baking tray and place the Calzones on the tray. Place in the pre-heated oven and bake for 15-20 minutes. When the Calzones are slightly golden-brown and take it out of the oven. Separate the egg white from the yolk. Brush the top surface of the Calzones with the egg white. Place them back in the oven and grill for 5 minutes at the same temperature. (Vegetarians can brush with milk instead.)


7. Cool to room temperature and serve with love.


I am sending this post to the KFB event "Yeasty Feasty".


Sunday, January 26, 2014

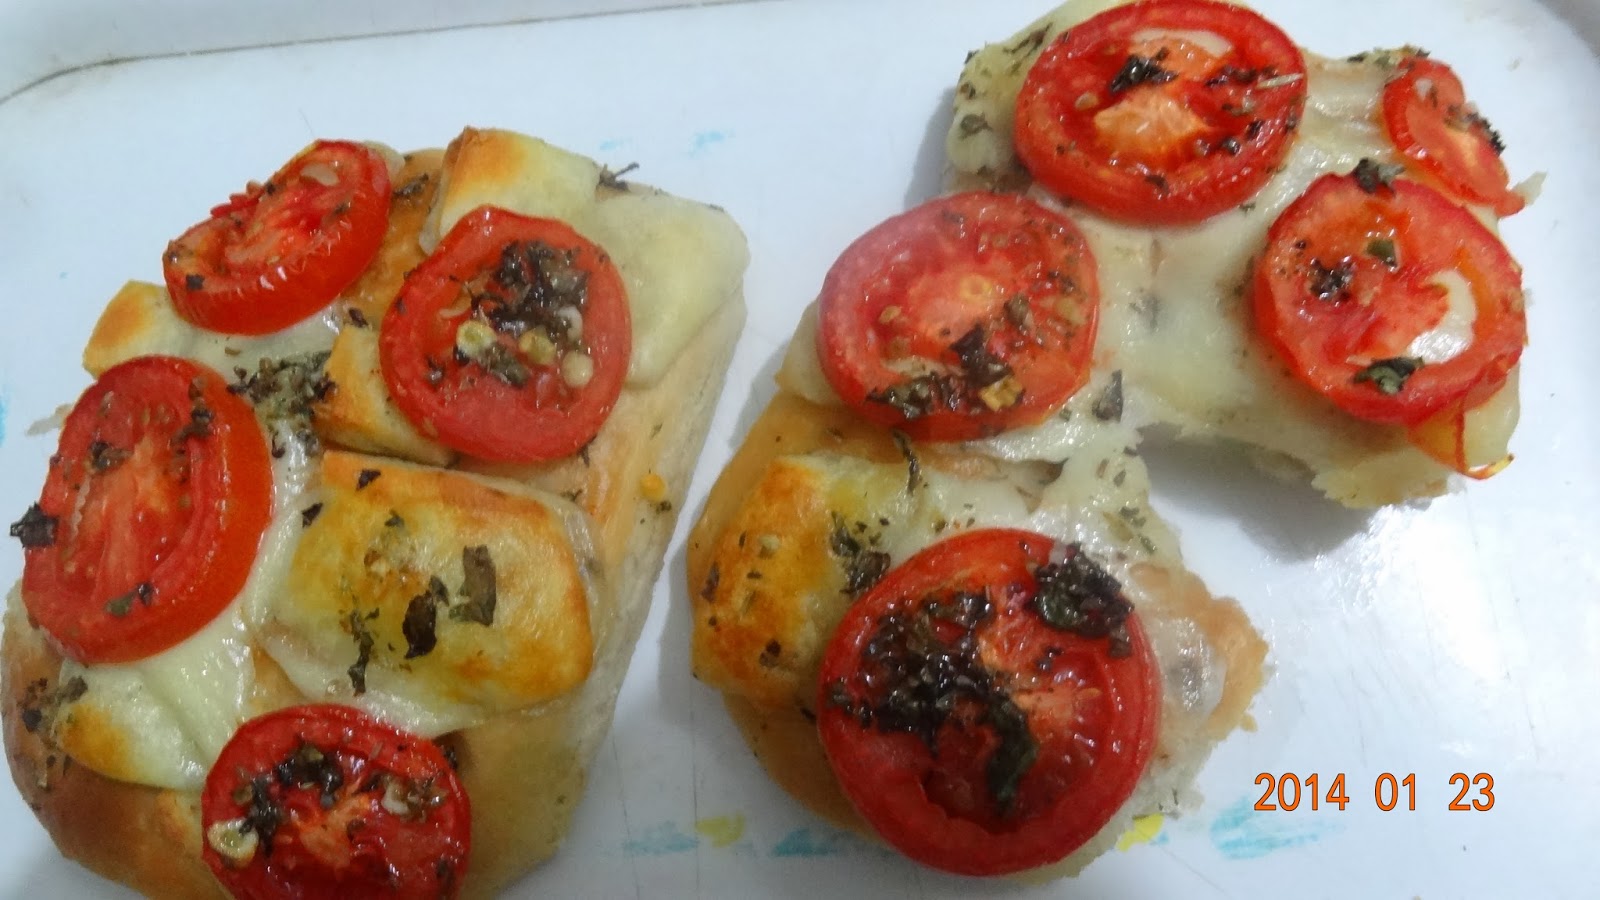
Focaccia Caprese: A rustic cheesy bread

(WE KNEAD TO BAKE: Bread #13, adapted from My Diverse Kitchen: Focaccia Caprese )

Bread-baking is one of my favorite things! Since I have started baking bread, in spite of loads of disasters I have got some lovely loafs by following the recipes of some expert bloggers on the Net. Recently, I was fortunate enough to become a part of a wonderful group called: We Knead to Bake. I was delighted! The WKTB group decides to bake one bread per month and this month's choice was Focaccia Caprese. Focaccia is a savoury flatbread that originates from Italy. It looks like pizza but is not exactly pizza.
For this recipe, I needed to use basil leaves. The Tulsi plant is an integral part of every Indian household but I did not have it in my house. My next-door neighbor very kindly let me take some leaves from her potted Tulsi plant.
Once all my ingredients were in place, I was all geared up to bake the focaccia.
I got a detailed recipe from Aparna's blog here. I also referred to the recipe at the Kitchen Whisperer.

Ingredients:

For dough:
Instant yeast - 2 tsp
Sugar - 1 1/2 tbsp.
All purpose flour: 3 1/2 cups
Salt: 1 tsp
Oil (preferably olive oil): 1/4 cup
Warm water: 1 to 1 1/2 cups
A little more olive oil for brushing dough
For the topping:
Tomatoes, sliced thin: 4-5
Round pieces of mozzarella cheese, cut into1/4” slices
Fresh basil leaves, cut into thin strips: 1/2 cup
For the Herbed oil:

Olive oil: 1/4th cup
Dried oregano: 1 tsp
Dried basil: 1 tsp
Red chilli flakes: 1/4 to 1/2 tsp
Finely minced garlic/ garlic paste: 1/2 tsp
Salt to taste
Fresh basil leaves for garnishing

Procedure:

To make herbed oil:
Put all the ingredients in a bowl and whisk them together. Keep aside till required.
To make the dough:
Put the yeast, sugar flour, salt and oil in the bowl of the processor and pulse a couple of times to mix well. Then add 1 cup of warm water (and as much more as you need) and knead until you have a soft elastic dough that is just short of sticky.
Remove the dough from the processor bowl, shape into a round and place in a well oiled bowl turning the dough around so it is coated. Cover and let it rise till almost double in volume. This should take about an hour.
Dough doubled in an hour
You can make this as 2 medium sized Focaccia or 4 smaller ones. For the rectangular Focaccia, take two rectangular pans of size 11" by 7" and oil them well. Then divide the dough into two equal portions and lightly roll them (or press out) out into approximately 11” by 7”. If making 4 Focaccia, then divide the dough into 4 equal portions. Roll each portion out (or press out) evenly into approximately 5” by 7”. You need not worry if the shape is not perfect! 
Transfer the dough to the baking tins. The dough will shrink a little. Use your fingers and push it out a bit making sure it’s evenly thick throughout. Let it rise for 20 minutes. Lightly oil your finger tips and press into the dough creating evenly spaced “dimples” in it. Generously brush the surface with oil.


Bake at 210C (410F) for about 18 to 20 minutes till it is almost done and is beginning to turn golden brown. Take the Focaccia out and turn up the heat of your oven to 230C (450F).
Lightly drizzle some of the Herbed Oil over the Focaccia and then evenly arrange some slices of mozzarella over the bread, leaving very little space between them. Arrange the tomato slices over this and a little sprinkle the chopped basil over this. The topping should cover most of the surface of the bread.
Drizzle some more Herbed Oil over the topping and return the bread to the oven.
Bake the Focaccia for 5 to 8 minutes or until the cheese has just melted. Remove from the oven and garnish with fresh basil leaves.
Cut the Focaccia into slices and serve while it is still hot. This recipe should serve 4 if served alone or 6 if served with a soup and salad.


I am sending this recipe to the KFB's online event - Love on Plate (Dinner for Two).


Friday, January 17, 2014

Crunchy Whole Wheat and Oats Cookies

(Adapted from Divine Taste: Eggless Wholewheat Oat Cookies)

 
The other day, hubby man turned to me and said "You've baked a whole lot of cakes and breads. How about some cookies?"
 
This is exactly what happens to me always. Whenever, I get all puffed up with pride that I have "done-it-all" he just casually remarks that there is something I still don't make! Anyway, just to prove him wrong, I started hunting up recipes.
 
While blog hunting, I stumbled upon this lovely, easy recipe by Anushruti of Divine Taste. I got her recipe here. Anushruti has combined the goodness of whole wheat and oats with a yummy taste. So, these cookies are tasty and healthy. Though the original recipe is an eggless one, I added an egg for better binding. Vegetarians can substitute the egg with 2 tablespoons of milk.


Here is the recipe:
 

Ingredients:

(Makes 24 cookies)
 
Butter - (1/2 cup)  at room temperature
Powdered sugar - 1 cup
Vanilla essence - 1 tsp.
Egg -1 (Vegetarians can substitute with 2 tbsp. milk.)
Oats - 1 cup
Whole wheat flour - 1 cup (Alternatively, use Whole wheat -1/2 cup and Maida -1/2 cup)
Cinnamon powder - 1 tsp.
Baking powder - 1 tsp.

Coarsely crushed cashew nuts - 2 tbsp. (Optional)

Process:

1. Add powdered sugar and butter in a deep-bottom bowl. Add vanilla essence and one egg (or two tbsp. milk for eggless cookies). Beat thoroughly till the butter and sugar are mixed well.


2. Mix whole wheat flour, Maida, baking powder, and cinnamon powder in a separate plate.


3. Now add the butter-sugar mixture to the dry ingredients and knead into a dough ball. If the dough ball is too soft to handle, refrigerate it for 30 minutes.
 
4. Now, divide the dough into two parts. Roll one part into a big chapatti, about 1/2 inch thick. Sprinkle crushed cashew nuts on top.


5. Using a cookie cutter or a knife cut shapes of your own choice. Take the other half of the dough and roll into balls, each ball should be the size of a lemon. Flatten each ball slightly with your palms.
6. Pre-heat the oven to 175 degrees C. Line a tray with butter paper. Brush some oil on the butter paper and place each cookie about an inch apart. This step is important. You need to maintain a space of 1 inch between each cookie, because the cookies will expand while baking.
 
7. Now, bake the cookies for 15 minutes. In fact, right after 10 minutes, you need to check on the cookies to see whether they are browning already. Once, the under-side of the cookies display a golden brown color, remove them from the oven and set aside to cool.

8. Don't worry if the cookies feel soft to touch while you have removed them from the oven. Once they cool, the cookies will harden up and become delightfully crunchy!

9. Once the cookies have cooled, enjoy this crunchy treat with a hot cuppa!


Thursday, January 9, 2014

Poush...the season of Puli-Pitha!

(Adapted from Loving Bangladeshi Kitchen: Bibikhana Pitha)


In Bengal, the time period between mid December to mid-January is known as the Poush maash. Poush calls for bitterly cold, misty mornings, when you want to snuggle inside your quilt for a bit longer and enjoy lazy mornings. This is also the season of Puli-pitha for every Bengali; specific types of desserts prepared with rice flour, jaggery and grated coconut.

Growing up in New Delhi, I was technically known as a "Probashi Bangali". But, thanks to my grandparents I never missed out on any of our rituals that are generally celebrated in Bengal. About the mid of Poush, my paternal grandmom (whom I used to call Amma) used to say to my mom " Bouma, bajaar thika ektu gur aar narkol aanba (Bouma, get some jaggery and coconut from the market)". On hearing these words, my heart used to dance a jig with joy because good food was in the offing. Under my Amma's and Maa's nimble fingers delectable paatishapta, dudh puli, rosh bora, and bhapa puli used to be prepared. The whole house used to waft with delicious flavours and me and my granddad used to rub our hands with glee in anticipation of these delicious sweets. My mom used to prepare a mean gurer payesh, which was the icing on the cake.

As for me, I am always pretty scared to prepare Puli-pitha on my own because I feel that I do not have the expertise needed for these delicate sweets. However, when the Kolkata Food Bloggers, launched an event of preparing Puli-pitha for Poush, I cast my fears aside and decided to give it a try.

This Pitha which I have made is called Bibikhana pitha. This pitha is the specialty of Bangladeshi cuisine. Since my ancestors belonged to the "Opar Bangla" (I am a Bangaal married to a Ghoti), I decided to try a recipe of my original homeland.

The beauty of this Pitha is that it can be baked in the oven. Alternatively, you can steam bake it in the pressure cooker. But since I love baking, so decided to crank up my oven to do the job.  I found the recipe here.


Ingredients:

 
Rice flour: 2 cups
Coconut (grated): 1 cup
Eggs: 4
Sugar/Jaggery: 1 cup (This makes the dish mildly sweet. Add more as per taste.)
Powder milk/Dairy whitener: 3/4th cup
Ghee: 3/4th cup
Cardamom powder: 1/2 tsp
Water: 1 cup
Raisin, chopped cashewnuts, and pista: a handful (for decoration)
 

Process:

1. Mix powdered jaggery with 1 cup water. Heat over low flame, stirring time to time, so that all the jaggery is dissolved in the water. Keep aside.
2. Heat 1 tsp of ghee in a non-stick pan and fry the rice flour for 2-3 minutes.
3. In a deep-bottom pan, mix the rice flour, jaggery mixture, four eggs (beaten well in advance), grated coconut, 3/4th cup ghee, milk powder, and cardamom powder.
4. Mix well till you get a thick batter with no lumps. I used my stand mixer. Next, grease an oven proof pie dish and pour the batter into the pie dish.
5. Pre-heat the oven for 10 minutes at 100 degrees C. Yes, you got it right! This Pitha is baked at the lowest temperature. The original recipe called for a temperature of 200 degrees F.
6. Place the pie-dish in the oven and let it bake for 1 hour. Alternatively, you can steam bake it in a pressure cooker for 1.5 hours. This Pitha is the epitome of slow cooking!
7. Once the top surface feels firm, take the pie dish out of the oven. Insert a toothpick in the Pitha. If the toothpick does not come out clean, or the top surface feels wet, pop it in the oven for 5-10 inutes more at the same temperature.
Just out of the oven
 
8. Cool to room temperature and de-mold the Pitha. Cut into diamond shapes or any shape you like!
9. Decorate with raisins, cashews, and pista. I used only raisins.
 
 
10. My hubby added some grated coconut on top. Chill in the fridge and serve.


I am sending this post for the KFB event: Poush Sonkranti delicacies.


Tuesday, January 7, 2014

Whole Wheat (Atta) Bread - (the No Maida Bread At Last!)

(Adapted from vegrecipesofindia.com - 100% Whole Wheat Bread Recipe)


I have a veritable love affair with the process of bread making. I may go through a phase of baking cakes, tarts, bread pudding et all, but whenever my spirits sag low, I invariably return to making my humble loaf of bread. Nothing gives me as much peace and happiness as a golden-brown, fresh-baked loaf of bread.


Some people have asked me " Don't you find the whole process (of making bread) really long and laborious?" Surprisingly, my answer is no. This so because other than the kneading process that actually lasts 10 minutes, the process does not need my active participation. I knead the bread and leave it to rise on it own sweet will. In the meantime, I can put in one solid hour of office work (since I work from home). I cant expect a sabzi or a chicken dish simmering on the gas to take care of itself for an hour or two, while I am busy with a document!


This recipe has been a real God- sent for me. I was never comfortable consuming loads of all-purpose flour in my daily bread. Ironically, whenever I bake whole wheat bread, the husband man and daughter refuse to eat it because it is dense and "not-so-tasty". Most whole-wheat recipes call for vital-wheat gluten, that is essential to soften and make the bread fluffy. Dassana of vegrecipesofindia.com has come up with a breakthrough discovery that adding curd to the dough is all it takes to make a whole-wheat bread soft and tasty. I found her recipe here.


Adding curd to the dough makes the dough acidic, that further helps in gluten development. If you do not have curd, you can use vinegar instead. Any kind of vinegar that you use for cooking purposes! I also added a little powdered flaxseed because I have read that flaxseed really softens bread. The bread may taste slightly of curd (or vinegar), but once you have the bread with jam or any other spread it's just fine.


Here is the recipe:


Ingredients:

Whole wheat flour (Atta): 3 cups
Warm water: 1.25 cups
Active dry yeast: 1/2 tablespoon
Salt: 1 teaspoon
Sugar (granulated or powdered): 2 tablespoons
Butter/oil: 2 tablespoons
Curd/Youghurt: 2 tablespoons (Or Vinegar: 1.5 tablespoon)
Milk: for brushing
Flaxseed powder (optional): 1 tablespoon

Process:

1. Mix Atta with salt. Add curd, sugar, yeast, flaxseed powder to this mixture.


2. Add oil.


3. Now add warm water and knead the dough by hand or using stand mixer.


4. The dough should be smooth, soft, and slightly sticky. You need to knead thoroughly for about 4-5 minutes. Add some more water if required.

5. Dunk the dough in a deep-bottom bowl and brush lightly with some water. Keep covered in a warm place for at least 1.5 hours.

6. The dough will appear puffed up and almost double its original volume.

7. Knead the dough once again and shape into a log.


8. Place the dough in a greased bread tin and keep in a warm place for another 1 hour.


9. The dough will rise and will be visible over the rim of the bread tin. Place a longitudinal cut on the top surface of the dough and brush with milk.


10. Pre-heat the oven to 220 degrees for 15 minutes.

11. Place the dough in the oven and bake for 25 minutes.

12. Cover the bread tin with aluminum foil after 10 minutes to avoid over-browning of the top surface.

13. Remove from the oven and brush with milk or butter.


14. The underside of the loaf should not be wet or sticky to touch. If you tap the lower side of the loaf, you should get a hollow sound. If you don't, just pop it into the open for 5 more minutes at the same temperature.


The bottom part of the loaf


15.Cool to room temperature before slicing the bread. Enjoy!


The lovely slices


Monday, December 30, 2013

Eggless Tutti Fruitti Whole Wheat Milk Buns

The end of the year 2013, was a very difficult one for me. I was loaded with lots and lots of work at the office front. Also, my little S was down with fever due to season change and to top it all the hubby dearest had to be away for a couple of days because of sudden demise of a close relative. So, in a nutshell, it was chaos with a capital C. Finally, today I got up the strength to bake something nice before the 31st. These sweet milk buns can be had at any time of the day/night. They are easy to make and store well. Excellent finger-food for kids!


Without further ado, lets get to the recipe.

Ingredients:

Flour: 3 and a half cups
Whole Wheat flour: 3 cups
Active Dry Yeast: 1 tablespoon
Salt: 1 teaspoon
Milk: 2 cups
Sugar:1/4th cup
Oil/butter: 1/4th cup
Tutti fruit: a handful
For decoration:
Chocolate sauce: 3 tablespoons
Colored small candy: for sprinkling

Process:

1. Take warm milk in a deep-bottom bowl. Add sugar to the milk. Sprinkle yeast on top.
2. Now add salt and mix once. Add the tutti frutti.
3. Now start adding flour and whole wheat flour alternately. You may need to add some more flour depending on the amount of moisture in the air.
4. Once the mixture forms a solid lump. Now add butter to this mixture. Keep kneading till you get a firm, smooth dough. Keep adding sprinkles of dry flour if the dough gets too sticky.
5. Grease a deep-bottom bowl and dunk the dough in it. Keep the bowl in a dry, warm place for one hour. In one hour, the dough will rise to double its size.
6. Now punch the dough and knead it once more. Divide the dough into small balls. Grease a cup-cake mold and place the balls into the molds.


 7. Keep the cupcake mold undisturbed for another 20 minutes. The balls of dough will appear puffed up.
8. Now preheat the oven to 200 degrees C. Bake the buns for 10 minutes.
9. Once the buns are done, grill the buns for 5 minutes in Grill mode.
10. Take the buns out of the oven. Brush with milk/butter.
11. Cool to room temperature. Pour a spoonful of chocolate sauce over each bun and sprinkle with coloured candies.

12. Serve and enjoy.
I am sending this recipe for the KFB Baking Palooza 2013. :-)